BMW 7 Series: Overview Of Audio Components
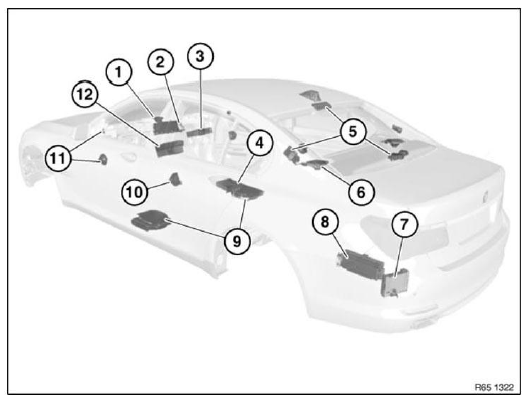
Fig. 25: Overview Of Audio Components
- Speaker (in dashboard)
- Central Information Display (CID)
- DVD changer
- DVD player, rear console
- Aerial diversity
- Speaker (in storage shelf)
- Satellite tuner
- Amplifier
- Central bass speaker
- Speaker (door, rear)
- Speaker (door, front)
- Car Information Computer (CIC)
REMOVING AND INSTALLING/RENEWING SPEAKER (MIDRANGE SPEAKER, IN INSTRUMENT PANEL)
Notes
Unclip trim (1) with special tool 00 9 325 from latch mechanisms and remove upwards.
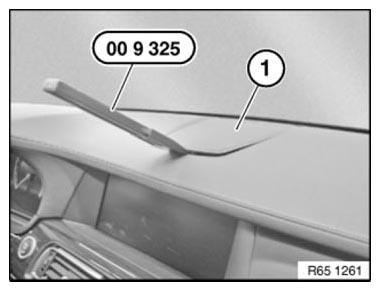
Fig. 26: Removing Trim From Latch Mechanisms Using Special Tool (00 9 325)
Installation
Marked retaining lugs must not be damaged.
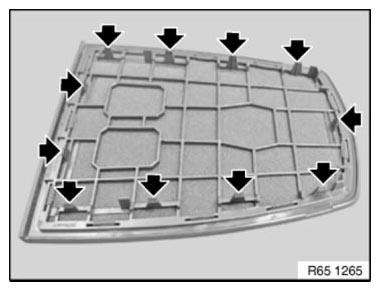
Fig. 27: Locating Retaining Lugs
NOTE: Graphic is an example!
Release screws (1).
Remove speaker (2).
Disconnect plug connection underneath and remove speaker (2).
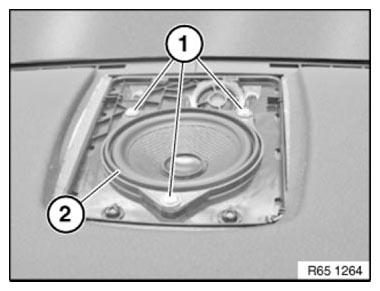
Fig. 28: Identifying Screws And Speaker
REMOVING AND INSTALLING/REPLACING DVD PLAYER IN REAR CONSOLE
IMPORTANT: Read and comply with NOTES on protection against electrostatic damage (ESD protection).
NOTE: Comply with notes and instructions on NOTES ON HANDLING OPTICAL FIBRES.
Necessary preliminary work
- F01/02: Clamp off BATTERY EARTH LEAD
- F03: Remove both battery earth leads
- Remove REAR CENTRE CONSOLE TRIM
- Remove CENTRE ARMREST STORAGE COMPARTMENT
Unlock plug connections (1) and (2) and disconnect.
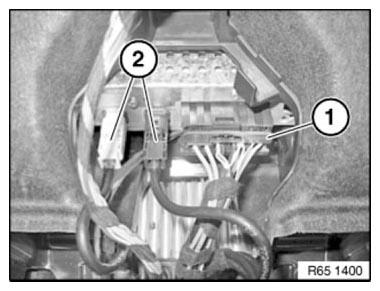
Fig. 29: Identifying Plug Connections
Release screws (1).
Remove DVD player (2).

Fig. 30: Identifying Screws And DVD Player
Replacement
Carry out VEHICLE PROGRAMMING/ENCODING.
READ NEXT:
 Removing And Installing/Replacing Front Speaker Carrier (Instrument Panel)
Notes
Unclip trim (1) from latching mechanisms with special tool 00 9 325.
Fig. 31: Removing Trim From Latch Mechanisms Using Special Tool (00 9 325)
Release screws (1).
Remove speaker carrier (2) a
Overview Of Aerial Diversity
Fig. 50: Overview Of Aerial Diversity
Aerial amplifier
Blocking circuit
AM choke
Back - up aerial
Interference suppression filter
OVERVIEW OF AUDIO COMPONENTS
Fig. 51: Overview Of Audio Compo
SEE MORE:
Brake Lines
OVERVIEW OF BRAKE LINES
Fig. 94: Overview Of Brake Lines
Brake hose, front
Brake tubes
Brake hose, rear
REPLACING ALL BRAKE PIPES
Notes
NOTE: The brake lines are only supplied in the straight version and
correct length with
connecting nipple.
Read and comply with GENERAL INFORMATION.
After
Hydr/El Control Components/Elements
REPLACING OIL ACCUMULATOR (GA8HP45Z)
Do not let skin come in contact with transmission oil and do not inhale
fuel vapors.
Wear protective gloves.
Ensure adequate ventilation.
IMPORTANT: Applies to vehicles from 08/2011
Remove transmission oil sump only after it has cooled down.
After complet
